

WHEEEEEEEE! I love this stuff.
Yeah, you have probably noticed that I tend to say that about everything. Oh well.
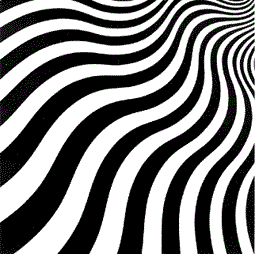
Anyway, Optical Art, more popularly known as Op Art was an artistic movement which began in the 1950's in Britain and eventually made it to the United States. By many accounts it peaked in popularity between about 1965-1968. Despite its brief lifespan as an artistic movement, we are still feeling its aftershocks in the contemporary works of artists such as Gerald Laing and in video games and puzzles (see http://fliiby.com/file/814231/br7isq3m1d.html ) or go to www.op-art.co.uk and check out the CRAZY animation http://www.op-art.co.uk/op-art-gallery/op-art-animation/nov-21-davidope.html . Fashion in the 1960's and beyond was also influenced by Op Art. Contemporary textile designers such as Helen Owen and designer Eley Kishimoto are also active in keeping the Op Art tradition alive and well.

Bridget Riley, Fragment 5/8
So what is Op Art? You have seen and experienced it sometime in your lives.
According to wwar.com,
According to wwar.com,
http://www.op-art.co.uk/op-art-gallery/op-art-animation/ Check these out, too! OK. So here is a little EXTRA CREDIT tutorial to get you going with this Op Art thing to get your feet wet. It will only take you a few minutes to get it done. You will need a piece of printer paper, a ruler and a pencil or pen. I found it at Bring it to class with on October 20 (A day) or 21 (B day) for full credit. I will collect them at the end of class. You may submit it after the due date for 25 point reduction. This assignment is worth 100 points.  Op - Art: Techniques Lines that Move For this drawing you will need the following supplies: a blank sheet of paper, a ruler, and a sharp pencil. Click on each step to see what it should look like. Remember to click on back to return. Step 1. In the center of the page, draw a 4 inch vertical (up and down) line. Now measure 1 inch and make a small mark. Now draw a 4 inch horizontal line (side to side) with one inch on each side of the vertical line. Step 2. Make a small mark at each 1/4 inch measurement across the length of each line starting where the lines cross. Step 3. From the top of the vertical line and going to the left, draw a straight line down to the mark closest to the center on the horizontal line. Step 4. Move down the vertical (up and down) line to the next mark. and draw a line to the second mark moving away from the vertical line. Continue moving down the marks until the entire left side is connected. Step 5. Follow this process for the other three sides of the drawing. |
